

If you’re tired of spending endless hours tweaking your vocal settings, desperately searching for that perfect sound, it’s time for you to install vocal presets. The digital audio workstation Reaper lets you unleash your creativity with vocal presets and effect chains.
So, let's get right into it!
Step 1: Find the Perfect Vocal Preset
The first step to vocal greatness is finding the perfect vocal preset, complementing your voice, or crafting yourself. You can choose from various Vocal Presets for Reaper available on Cedar Sound Studios. Crafted by professionals, these presets will give you that studio finish you want.
Step 2: Navigate to the Plugin’s Folder
Now you need to locate the plugin's folder on your computer.
On Windows, the default path is often nestled at C:\Program Files\Common Files\VST3
Mac users can navigate to Macintosh HD\Library\Audio\Plugins\VST3

The exact location of the plugin's folder may vary depending on your operating system and Reaper's configuration.
Once you’ve located the path, copy your preset files directly into the folder, avoiding sneaky subfolders. This ensures that Reaper recognizes and reads your file as a preset.
Step 3: Launch the Latest Version of Reaper
Next, launch your Reaper. Ensure you're using the latest version to follow along with us. There’s no need to worry even if you have a different version since almost all steps are identical across all versions of Reaper.
Open a new project or load an existing one, and you’re ready for the next step.
Step 4: Insert an Effect Into Your Track
On your project, select the track that you want the effects on. You can find a small “Fx” button on the left-hand portion of the track. An effects browser window will appear on your screen after you click it.

The effects browser contains all the plugins and effects, each representing a unique set of audio processing tools. Select any effect or plugin you want by double-clicking the options from the list.
Step 5: Load the Preset
You’ll see a dropdown button on the dialogue box with “No Preset” selected as a default value. Click on it and select the preset you want to apply to your track.

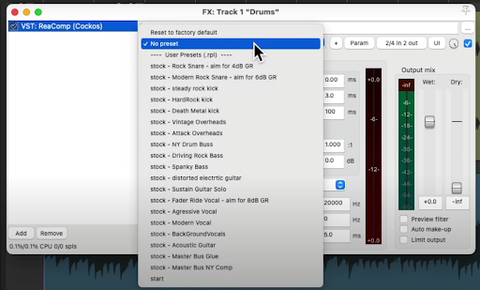
Depending on your need, you can select the preset you downloaded earlier or even choose from Reaper's numerous stock presets. Based on your computer's specs, the presets might take a few seconds to load.
Step 6: Adjust the Settings (optional)
The vocal preset has been applied, but you can still tweak the settings and change the values according to the demands of your project. Play with the EQ and compression settings. Pro-tip, listen to the audio after each tweak cause you never know when you might hit that sweet spot.
To make this a beginner-friendly tutorial, we have used default VST plugins provided by Reaper, following clear vocal preset guides to apply the preset correctly. However, you can also use professional audio plugins like StudioRack to integrate vocal presets into your project seamlessly.