
worldwide. It's packed with powerful tools for music production, including awesome vocal processing and effects. Adding vocal presets to this workstation makes your work efficient and quick by giving you pre-designed settings and effects that instantly enhance your vocals.
If you are wondering how to integrate Ableton vocal presets, we’ve got you covered. Whether you're a seasoned pro or just starting, our instructions will seamlessly integrate these presets into your workflow. Explore new sonic possibilities and add that professional touch to your music projects!
Let’s get started with the complete guide to installing vocal presets on Ableton.
Step 1: Unzip and Move the vocal preset files

Locate your downloaded preset file and double-click on it to unzip it. Once you unzip the file, move the .adg file.
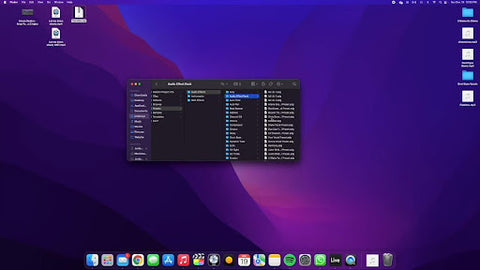
For MacOS:
Go to Music>Ableton>User Library>Presets >Audio effects> Audio effects rack and move your downloaded preset to the audio effect rack.
For Windows:
Open documents, and go to Ableton. Navigate to User Library> Presets> Audio effects> Audio effect rack. Move the preset file there.
Step 2: Open Ableton
Launch Ableton on your computer. Make sure you are fully updated to Ableton 11 Suite. The presets don’t work on the earlier versions.
Step 3: Access the browser
Find the browser panel in Ableton Live. If you don't see it, simply press the "Tab" key on your keyboard to toggle the browser on.
Step 4: Locate the Presets folder
Within the browser panel, navigate to the "User Library" folder. A drop-down must appear. You'll find a folder in the User Library named "Presets." Open it up!

Step 5: Find the folder for the specific plugin
Depending on your vocal preset, you may need to locate the folder specific to the corresponding plugin.
Step 6: Copy or move the preset files
Copy the vocal preset files (with the ".adv" or ".adg" extension) into the appropriate folder. You can drag and drop the files directly into the folder or use the copy-paste function.

Step 7: Restart Ableton Live
Close and reopen Ableton Live to ensure it recognizes the newly added vocal presets.
Step 8: Access the presets within Ableton Live
Once Ableton Live is back up and running, you can find and access the vocal presets within the corresponding plugin. For example, if you added presets for Auto Filter, simply click on the Auto Filter device and select the preset you want to use.

Step 9: Install Pitch Corrector
We recommend inserting a pitch corrector like AutoTune into the first insert. Use Key Finder to know the key and adjust the pitch corrector.
That’s it! You’ve successfully installed vocal presets in Ableton Live. Remember to explore different vocal presets and experiment with customizations to find the perfect sound that suits your artistic vision. With Ableton Live's versatile tools and the power of vocal presets, you can take your vocal recordings to new heights and create music that truly stands out.