

Having the right tools at your disposal is necessary to produce professional studio-quality music. You need the combination of a professional DAW, a high-quality plugin, and premium vocal presets to elevate your vocals to a new level. We'll take your hand and guide you one step at a time through this intricate process of installing vocal presets on Waves using their Studio Rack plugin.
So, let’s dive in!
Step 1: Get the Vocal Preset File
Find a vocal preset file that catches your eye. We have numerous presets created by talented producers and sound designers. Take your time to search for the best option from Cedar Sounds Studios.
Preset files are typically in a compressed format like RAR and ZIP. Right-click the file to “Unzip” or “Extract” its contents in an easily accessible location.
Step 2: Install Studio Rack on Your Computer
Next, you need to download the Studio Rack plugin from Waves. Go to their website and navigate to the “Download” section on their Navbar. Click on “Download Waves Central”. After downloading, open it and navigate to install products > All Products > StudioRack. It will start the installation of the Studio Rack plugin for your DAW.

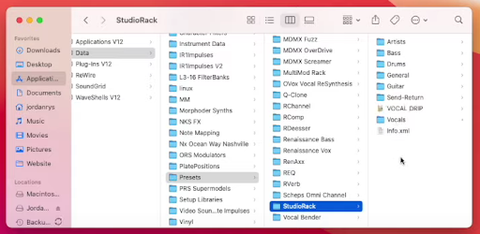
Step 3: Move the Preset Files to Studio Rack
Now that Studio Rack is ready; it’s time to integrate the vocal presets into the plugin. Locate the preset files (.xps) you extracted earlier and move or copy them to the designated folder accessible by Studio Rack as shown below:
For Windows:
C:\Program Files (x86)\Waves\Data\Presets\StudioRack
For Mac:
Macintosh HD\Applications\Waves\Data\Presets\StudioRack
Step 4: Launch your Digital Audio Workstation (DAW)
Launch any digital audio workstation (DAW) you know and create a new project or session. Also, add a vocal track where you want to apply your preset.
Studio Rack is a flexible plugin and can be integrated into any DAW, giving you the edge. We’re using “Logic Pro” as our primary DAW. You may use any DAW you feel comfortable with, as most of the procedure to install a vocal preset is the same.
You can look for Studio Rack among your installed plugins and load it onto the track. After loading it, you can move forward with the next step.
Step 5: Apply the Vocal Preset
With the plugin loaded onto your track, it’s time to apply the vocal preset. On top of the plugin, you’ll find a small tab or button with the text “Load”. It’ll show a list of options after you click on it.
Studio Rack has identified it since we’ve copied our vocal preset to the designated location. Thus, you’ll see the preset name on the list of options.
Select any preset you like, and it’ll load in a few seconds, depending on the specs of your Mac/PC.


Step 6: Adjust the Settings (optional)
Studio Rack offers a wide range of controls and parameters for customization. Feel free to experiment with the preset settings. You can tweak the EQ frequencies, adjust the compression levels, or add additional effects within the plugin.
Remember that moderation is the key! So be careful when adjusting the values because you don’t want your audio to sound lifeless and too robotic. Let your voice shine, and have fun with the Waves Preset.