
Do you need help adding sample packs in Reaper? There are a lot of options and choices that can present a hassle in your musical journey. This guide explains how to add sample packs in detail.
Step 1: Download and Locate the Sample Packs
You can choose the sample packs from the diverse collection in all styles at Cedar Sound Studios. After downloading them, navigate to the Downloads folder. If they are in compressed format, use the in-built tool to uncompress them.
Step 2: Add the Sample Packs
Method 1
- Go to the folder containing the samples.
- Select the individual sample.
- Drag and drop into the mixer track in Reaper.

This method is suitable for quickly inserting single samples, but it is time-consuming for a large group of samples. Let’s get into the better method.
Method 2
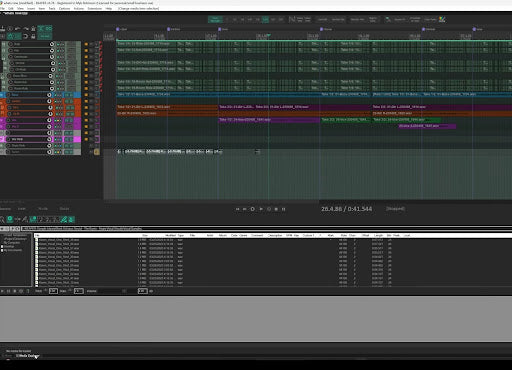
- Click “View” on the toolbar.
 2. Click “Media Explorer”.
 3. You can see the folders in the Media Explorer.
 4. Browse to the folder containing the samples.
 5. You can preview each of them by single-clicking samples. You can use the buttons on the bottom of the explorer to change the pitch and play rate.
 6. You can click on any column heads to sort by that column. Double-click to invert sort.
 7. Change the pitch or rate from the button if you want to preview the samples in
different forms.
8. On the bottom right, there is some information about the samples. You should
thoroughly check that information.
 9. If you can’t see that, expand that by hovering the cursor over the waveform, clicking and dragging upwards.
 10. On the top left, there is the “Insert” button. It will insert the selected samples into the project. Use this to import the samples.

More About the Tools
- A toggle for the media information box is displayed on the bottom right. If you can’t see that media information box, turn this on.
 2. The next section has some tools for matching tempo.
 3. You can preserve the pitch of the sample when changing the rate
 4. You can dock the media explorer by this.
 5. Clicking it will place the media explorer beside the mixer at the bottom. Recommend for easy access.
Although this is satisfactory for most cases, it can be optimized better for maximum ease of use and efficiency. Here are the steps:
1. In the media explorer, select and right-click the sample containing the folder.
 2. Click on “Make Database from Folder”. It will take a moment to index the samples inside the folder.
 3. You can use the search function to search for the required sample quickly. The major benefit is tagging samples for quick sorting and searching.
 4. To tag: Right-click on the sample in the file explorer.
5. Click “Edit metadata tag”.

You can use the templates or use custom tags.
Here is an example:
- Right-click the file, click “Edit metadata”, and “Description”. Give it a name and click “Okay”.
- Now you can see that it shows up under the description column in the file explorer.
- There is no mechanism for automatic refresh in the main folder. To refresh the folder, right-click on it and click “Scan Database for new files”.
 4. Now, new files and edits will be added.
 5. Simply drag and drop them from the explorer to add the samples.
We hope you can now easily import the sample files and configure Reaper for maximum efficiency.